Halloween 2018 – Mermaids Heart Tutorial

Halloween 2018 – Mermaids Heart Tutorial

Today I’m showing you how I did this look with the Dragon Heart palette from Revolution Beauty. Get yours for £7.

Products Used

Products Used
Unicorn Heart Palette – I Heart Revolution
Hi-Viz – Sugarpill
Ultra Cool Glow Palette – Revolution Beauty
Trendy Teal Pomade – Revolution Pro
Aqua Seal – Revolution Beauty
Glisten Up – Revolution Pro
Sinister Seduction Lipstick – Revolution Beauty
Mascara Revolution – Revolution Beauty


Halloween 2018 – Dragon Heart Tutorial

Halloween 2018 – Dragon Heart Tutorial

Today I’m showing you how I did this look with the Dragon Heart palette from Revolution Beauty. Get yours for £6.99.

Products used

Dragons Heart Palette – I Heart Revolution
Mischief Mattes – Revolution Pro
Pro Contour Book – Lunatick Labs
Hustle Glitter Liner – Collection Cosmetics
Renaissance Flick Liner – Revolution Beauty
Chameleon Diamond Dew – Lime Crime
714 24/7 Liner – Urban Decay
La Diamond Crusher – Lime Crime
Heirloom Diamond Crusher – Lime Crime

Halloween 2018 – Unicorn Heart Tutorial

Halloween 2018 – Unicorn Heart Tutorial

Today I’m showing you how I did this look with the Unicorn Heart palette from Revolution Beauty. Get yours for £6.99.

Products used

Unicorn Heart Palette – I Heart Revolution
Unicorn heart Highlighter – I Heart Revolution
Lock It Concealer – Kat Von D
Original Primer Potion – Urban Decay
White Liner – Freedom MakeUp
Asteroid Eyeshadow Topper – Barry M
Stardust Eyeshadow Topper – Barry M
Supernova Eyeshadow Topper – Barry M
Bag Gal Bang Mascara – Benefit
Unicorn Dream Lip Kit – Revolution Beauty
Fantasy Lip Gloss – I Heart Revolution

Revolution Pro Mischief Mattes Palette – First Impressions and Festival Face

Revolution Pro Mischief Mattes Palette – First Impressions and Festival Face

Meet the Regeneration Trends Mischief Mattes Palette from Revolution Pro. It costs only £8 for this collection of bright mattes.

Revolution-Pro-Regeneration-Trends-Mischief-Mattes-Swatches

As you can see from above it swatches very well. In practice, I had a little more trouble with the greens showing up as you can tell from the video.

Overall, as I have played with it more since making the video I do like this palette for the price. Worth getting it for festivals and bright colourful look.

Avon Extra Lasting Plump and Stay in Rosey Resistance Review & Swatch

Avon Extra Lasting Plump and Stay in Rosey Resistance Review & Swatch

Rosey Resistance is an orange based pink colour from the Extra Lasting Lipstick range. It costs £5 from their Avon website or from your local Avon Lady.

Avon-Extra-Lasting-Plump-Stay-Rosey-Resistance

This had two ends, one with the colour and the other with a gloss. The colour end dries down but is a little sticky without the gloss over the top. The gloss is a plumping gloss and will make your lips tingle as the plumping effect happens.

Avon-Extra-Lasting-Plump-Stay-Rosey-Resistance-Swatch

The gloss itself does wear off and the colour does too. I’ve found it doesn’t stay the 8 hours but does wear well. It will definitely come off when eating food and does leave itself on glasses. It does tingle to plump the lips but I didn’t find it painful at all and did make my lips appear a little bigger.

With gloss starting to be the new trend, this one is great to go for. There are five other colours in this range. Wirth checking out if you’re okay with the tingle.

Lime Crime Velvetines Beet It, Dreamgirl, Jinx, Raven & Nightshade Review & Swatch

Lime Crime Velvetines Beet It, Dreamgirl, Jinx, Raven & Nightshade Review & Swatch

Lime Crime is well known for their Velvetine formula. So I decided to look through my collection and pick out the deepest berry shades.

Lime-Crime-Berry-Matte-Lips

They cost £16 each from UK Suppliers or $20 USD from Lime Crime. If you’re in the UK, I’d definitely skip the Lime Crime website. Shipping is now $20.95.

I’m going to say upfront while I love the formula, I find the deeper berry shades don’t stay put like the lighter shades do. They tend to last and also stain but do smudge, which is unfortunate.

Lime-Crime-DreamGirl-Swatch

First of the berry shades is DreamGirl. This was released as part of a valentines set but unfortunately, I can no longer find it on the site. You might be able to find it from one of the UK suppliers.

Lime-Crime-Beet-It-Swatch

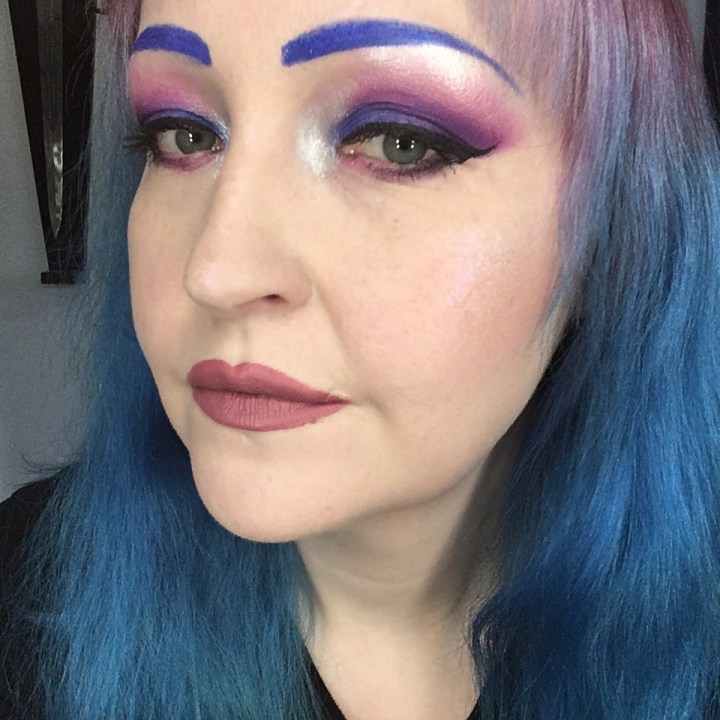
Beet it is a much warmer shade and on the lighter end of the spectrum. It pulls warm on met but it’s actually a much cooler colour. I have many smudging issues with this one but I still love the colour.

Lime-Crime-Jinx-Swatch

Jinx is one of the deeper colours and as you can see it pulls grey on me. It also has slight coverage issues. Jinx looks a proper purple on the website, so be aware of your undertones.

Lime-Crime-Raven-Swatch

Raven is the colour I expected Jinx to be. It’s described as the darkest purple and it can be with a couple of layers. However, this can make it a little drying. Just like all the colours above it suffers from smudging issues.

Lime-Crime-Nightshade-Swatch

Nightshade is a deep deep red. It’s described as a deep purple red and I can see the purple tones. Again this pulls warm on me.

I love the Lime Crime formula. I always have.  They’re my favourite matte lipsticks. However, these berry shades do have the issue of smudging which is a shame because I’d love these to go on and stay on. My favourite out of all of them despite the coverage issues is Raven. Which one is your favourite?

They cost £16 each from UK Suppliers or $20 USD from Lime Crime. If you’re in the UK, I’d definitely skip the Lime Crime website. Shipping is now $20.95.

Eat Sleep MakeUp Repeat Pictorial – Purple and Pink Eyeshadow

Eat Sleep MakeUp Repeat Pictorial – Purple and Pink Eyeshadow

Something a little different for you today and something I’ve certainly never done on this blog before. As part of my rolling Project Pan #projectonepan I promised I’d do at least one look with the palette I was using. While I have done that (Green Halo Eye Tutorial), I wanted to do at least one more with this palette. So today I present to you a pictorial on how to do a pink and purple eye with the Eat Sleep MakeUp Repeat palette.


Start with the Neon Pink (Right Now) in the crease and blend upwards. Place a purple (Magician) on the outer third and blend. Use the brightest blue (Sleep All Day) On the inner third. In the middle use a shimmer blue (Rave All Night). Deepen the outer with a darker purple (Ibiza Heaven). Highlight the brow (Rave Off) and then inner corner with the same. Add liner and lashes and you’re done.

ESMR-Blue-Purple-Eye

You don’t have to use the white based highlighter for the brows, it’s a bit 90’s. However, we’re going for bright here so it works.

So what did you think? Would you like to see more pictorials?

My Little Pony Collab | Princess Luna Eye Shadow Tutorial

My Little Pony Collab | Princess Luna Eye Shadow Tutorial

I was fortunate enough to be invited to another Collab, this time for My Little Pony.

To create this look I used the Eat Sleep MakeUp Repeat from Revolution Beauty and the Urban Decay Black Palette. For the sliver, I used Aqua Seal from Revolution Beauty and Tiara from Sugarpill cosmetics.

The lovely people in this collab can be found here


Green and Sliver Halo Eyeshadow

Green and Sliver Halo Eyeshadow

Hello, my lovelies. Today as part of my Rolling Project Pan, check out my into here, I am showing you a look with the Eat, Sleep, MakeUp Repeat. This is a lovely green Halo eyeshadow look but this can be replicated with the other two pans as well.

You can get this palette at Revolution Beauty or Superdrug.

I was wearing it in this picture but using the blue panel.

Blue-Halo-Eye-Eat-Sleep-MakeUp-Repeat

Let me know what you think of it in the comment section below and come back for more like this.

Upgrade your Battle Station

Upgrade your Battle Station

I don’t know about you but I think black shiny furniture is beautiful. So when I upgraded my space that’s what I looked for.

I found the most amazing set and like everyone I had all these good intentions of keeping it as pristine as possible. Of course mornings happened and not being a morning person all my good intentions got forgotten. Then disaster struck, I was using a sugar water for glitter glue for a night out and did not realise the bottle had leaked. I headed out and the next morning I went to pick it up off the top. That’s when I pulled a little too hard and some of the top came off. It’s left a nasty ring that haunted me for a while.

DSC01192

So that’s the state it’s been in for a while because I thought my only two choices were getting it professionally refinished, which would be super expensive or looking for a replacement. Then one day I had an idea. Sticky back plastic.

So I did a little research, not too deep but just enough to know the idea wasn’t total trash. Then I pondered what kind to use. Of course I could go plain black but that would require a lot of prep work. The surface would have to be totally smooth. So in the end I decided on something a little more forgiving. Fake black marble.

Of course there was a little prep to do. I cleaned the surface, removed any nail polish stains and sanded down the ring. It wasn’t 100% smooth but close enough. After that I measured the top, as the edges are a little rounded I didn’t need it to be 100% flush with the edge.

Do take you time on this step. Measure and remeasure the top. Mark the underside of the plastic and then measure it again. Once the measuring is done, cut as straight as you can. Lay the piece on the top and check it again. If you’re happy then you can start the peel. Peel only one edge and I’d chose the thinner side. Stick it down slowly. Work slowly rolling the backing paper off and sticking it down. If you get a bubble push it out of lift it up and stick it back down until the bubble is gone.

DSC01195

I’m not the most skilled person and yet I managed to do it’s mostly smooth and bubble free. There is one area where it isn’t and that’s where the ring mark is. I’m not really surprised but I am surprised how easy it was. I need to sand and level the surface down a bit more where the mark is but the benefit of the marble effect is it is very forgiving. The other thing about this particular plastic, is it is removable and I can redo this at any time. I don’t see me worrying about the mark for now and it looks great.

So that’s how for a fiver I managed to make my Dressing Table looks almost brand new. Do you think you you’d try this? Let me know in the comments below.

DSC01194